Wednesday, August 21, 2013

Easy Play Dough

Awesome Play Dough


2   cups   Flour
1   cup    Salt
4   tsp     Cream Of Tarter
2   cups   Water
2   tbsp    Vegetable oil*

*original recipe* I used shortening because that is what I had on hand.


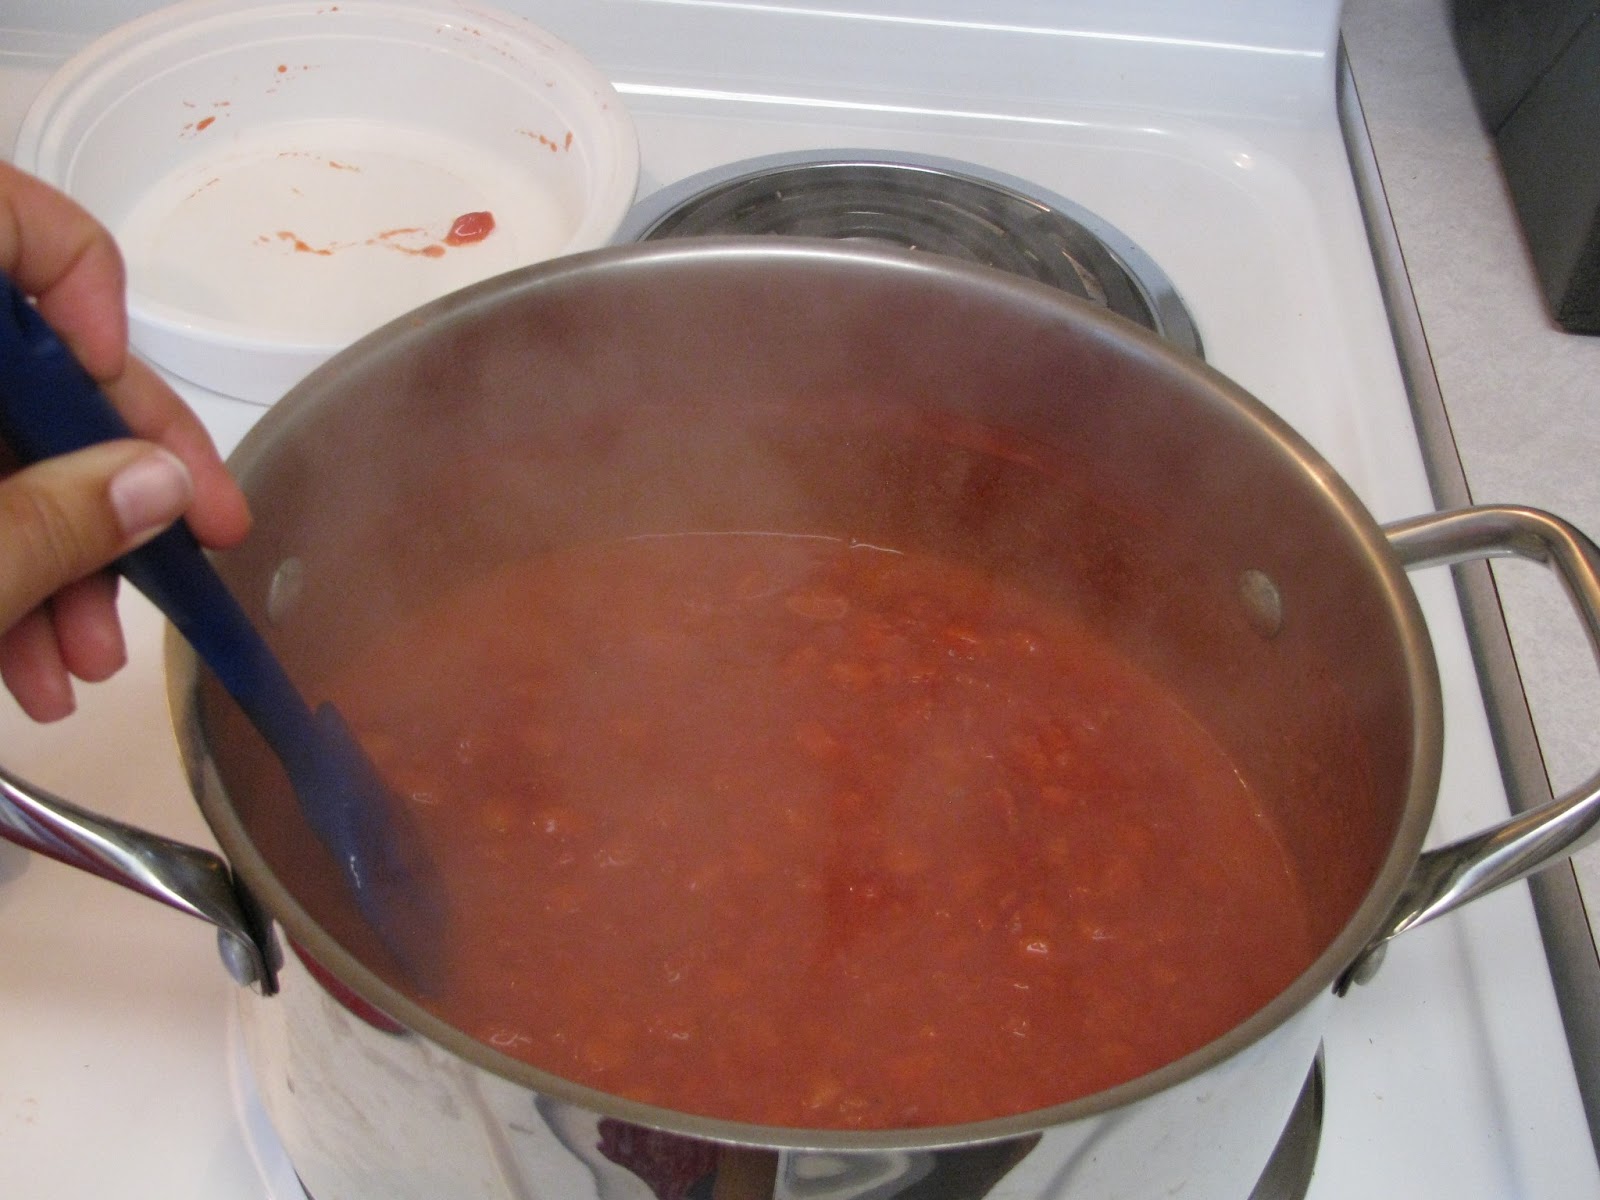
In a Medium sauce pan combine all ingredients. *** Since I used shortening, I measured that out first and put it into the pan until melted THEN I added in the rest of the ingredients.*** On medium-low heat, Stir constantly until a soft dough forms. You will need something strong to stir it with. Keep stirring until the dough starts to pull away from the sides of the pan. It took about 5-10 minutes for this to happen.

Remove from heat and separate into 4 equal sized balls. Knead gently until smooth (roughly 4 minutes per ball, depending on how hard you knead and if you have 'little' hands helping).

Make a large thumb print into the center of each ball. Add several drops of desired color. I used regular liquid food coloring. SLOWLY, knead the colors in. If you do this too fast the dye could splash out and get onto surfaces/clothing. I had no issues with staining and I had my 3 year old next to me 'helping' me & poking everything. 

Keep kneading to combine color. Add more to get the desired depth of color. Store in an air tight container.
I used an old plastic container and separated with wax paper. I actually halved the play dough and saved the other half in this container shown... to make it last a little longer.


She was SUPER excited to play with her new play dough.

This was a great project for us to make together. We measured out the ingredients, then when it came time for the actually cooking I let her keep playing with the flour next to me on the counter. She picked which color we did and helped mix the colors into each dough ball. . It was a great leaning/bonding experience. Yes, it might be messy.... let it go. They are only young once, enjoy it.

Friday, April 19, 2013

Home Made Jam

     I like to make jam in smaller batches these days, but for this blog post I just happened to be making a large batch so I just wanted to show you a 'how to' including photos. It is really not hard. Even my mother has got into making her own jam. She finds it very easy as well.   

   There is nothing better then Home made jam!! Have you looked at the ingredients on the back of Jam sold in the stores? The main ingredient is High Fructose Corn Syrup... in my house hold that is a 'no-no'. So, I have been making my own Jam for over a year now. We LOVE it. And it cost SO MUCH LESS then store bought organic or not. I like to buy strawberries when in season then kinda go overboard making jam then stock up my pantry or giving it away. Strawberry seems to be the most popular, but when we go blueberry picking in a few weeks I will be making lots of blueberry jam. I have mixed it up before, but I DO follow recipes & just find the one that I have the most fruit on hand.  

        Now, I have gotten pretty good at this. Note, why I can take pictures & cooking it at the same time. Something I would NOT recommend. I would also recruit some help for the first couple of times. Even if it as simple as having your hubby/spouse wipe off the jars, cap & put lids on them. Start off doing small batches. The Ball Pectin Jars have recipes for single (2 pint) batches & you can double or triple them. Start off slow, enjoy the rewards of making your own food.

       The best advice I received when canning was 
"Canning is not about preparing, it is processing. You MUST prepare before you can process." Meaning, you can NOT be getting things ready ie: sugar/pectin or mashing while you are cooking your jam. 

Ready? Lets get started...

Prep first, make sure all of your fruit (in this case strawberries) are capped (stems cut off, along with any bruises) sliced, washed, mashed & measured (and put straight into 5 qt pan). Have all your sugar measured out into a bowl, same with the pectin & set them aside. 

http://www.canningbasics.com/water-bath-canning.html

Honestly, it has been a while since I have made a large batch like this. I really do find it easier to make smaller batches. This is 3 batches & might actually be my limit with out using the aid of my husband. I usually tend to stick to 1-2 batches because they can be done quickly & since we are planning on eating them soon I do not give them a water bath. Water baths & pressure canners are really only used when you are planning on storing your jams for a long time. So, usually I just fill them up cap them & let them sit on the counter over night, then they go straight into the fridge.


 I do use the instructions on inside of this Ball Real Fruit Classic Pectin powder.
For every 2 (8oz) half pints of jam you will need:

1 1/3 prepared fruit (mashed strawberries, best to do in layers)
1 1/2 tsp Pectin
1  Cup Sugar

So, for THIS recipe I used:
3 3/4 cup mashed strawberries
4 1/2 tsp Pectin
3    Cups sugar

Equipment:

5 qt Pot
8 qt pot
Tongs
Spatula (high heat resistant) 
Funnel (a canning funnel works best)
Dish Cloth (to spread out next to area, so you can put hot jars & not make a mess)
2 Cloths (1 damp= to wipe rims of jars &1=just in case you need another)
Ladle 
2 regular mouth Pint jars 
2 wide mouth pint jars
1 half pint regular mouth jar  (always best to have too many jars then not enough)


*Put a large pot on the stove (I prefer the back burner so it does not get in the way), on  med-high heat bring water to a boil
(I like to fill 1/2 way with water, then boil water in my kettle & add it to pot)


*Once it comes to a boil turn to med-low heat & add jars you intend on using. I like to OVER estimate how many I will need. 

If using pint jars 1 recipe(batch) = 1 pint. We are doing 3 'batches'.
 & it is better to have too many jars then not enough


Keep the jars in the pot until ready to use. Pouring HOT liquids into a cool jar could cause it to crack/break.

*Take a clean dish towel (not shown) & put it with-in reach so when you take your jars out of the boiling water you can rest them on the towel
 (DO NOT LET THE TOWEL TOUCH BURNERS OF THE STOVE)
Also, have damp cloths (for wiping rim's) & a dry one (for drying them & the lids/bands)


*Put Lids & Bands in bowls & cover with hot water. You can NOT reuse previously used (for canning) lids. Bands that are properly cleaned/dried & not damaged CAN BE reused.


*Over Medium-High heat use a spatula (high-heat tolerant) to slowly stir in Pectin.


*Keeping med-high heat stir occasionally until it comes to a full rolling boil
 (that can not be stirred down) & now stir constantly.


Keep stirring


*Now add all of your sugar & stir to dissolve. Return to a full rolling boil.


*At this time I would start carefully taking your jars out of the pan & placing them onto the towel. Tongs work well, but a canning tongs work better 
(I just don't have any yet. I just work with what I have.) 


*Make sure you are ready, when it comes to a boil there will be no turning back....
Have your funnel ready.


After your 1 minute is up Carefully pour or ladle jam into jars, fill 1/4" from the top


With your damp cloth wipe rims clean.


After rims are clean put on lids securely then screw on rims. Not too tight, just enough for it to be closed. Be careful though the jars will be HOT!! I use a towel or pot holder to hold jars while screwing on rims.


This is the same pot of water I used to clean/sterilize the jars BEFORE I put jam into them. I kept it on low-med to keep water hot till THIS very part.
I am experimenting with the Water Bath method. I think next time, if I will be doing more then 2 jars I will line the pot with a wash cloth & separate them with a few more so they do not bang together (just like I did in my tomato sauce)

But, for this picture I turned water up to med-high CAREFULLY put jars into the water & covered them until they were covered @1-2" of water. Boil for 10-15 minutes. Turn heat off & remove from burner. 
LET THEM COOL IN THE WATER BEFORE TAKING THEM OUT.


Voila 
I honestly am not sure what I was thinking when I did NOT fill them to 1/4" from the top... but you live & learn no big deal. 
I left the 2 jars that I 'messed' up out on the counter till they cooled completely then put them into the fridge so we can use those first. The other 2 I let them cool then put them into my pantry for future use.

Now, I think I got everything right...lol. And I would recommend going to Walmart/Lowes or any home improvement store at the very beginning or end of summer to find the Ball Pectin on clearance. When I do find them, I buy ALL of them ;)


Sunday, March 31, 2013

Easy DIY Spa Essentials


Relaxing- Home Made Bath Salts   

-Empty Jar with Lid (can re-use any glass jar, a mason jar)
-1 LB Epsom Salt (found in the $.88 section at Wal-Mart by the pharmacy counter)
-3 Drops Essential Oil (I prefer Lavender Oil because of its antibacterial, antibiotic properties)
-1 tsp Course Salt (I have Kosher Salt)

I always fill my jar(s) with the Epsom salt before beginning to make sure I use enough. Then empty your jars with the Epsom salt into a large container the will give you plenty of room to stir, add @ 1-2 tsp coarse salt & mix well (it will keep it from clumping together)Next, add your oils & stir well (that is what the spoon is for). 
As far as the coarse salt, I add 1 tsp per 1/2 pint jar.......

Keep in mind whatever container you use to mix will hold onto the smells from the oils, especially plastics. Note: that is why my funnel says "NOT for food use"


They make great gifts whether you make them ahead of time or need a last minute gift. I always put a nice washcloth in the bag with a small candle. This is also a great way to up-cycle glass.


Milk-Bath Powder

1 Cup   Powdered Milk
½ Cup  Finely ground old fashion oats
½ Cup  Baking soda
2 tsp    Cornstarch
1 tsp    Cream of tarter (found with the spices)
1 tsp    Cinnamon or chocolate powder or even cocoa powder (optional)

The original recipe said to combine everything in the food processor. 
You could even use a smaller chopper like the Magic Bullet to ground the powdered milk and oats. Then add all of the ingredients to a mixing bowl & whisk it all together thoroughly.
--Each batch will make 12 ounces, which is three 4-ounce jars

DIY Deodorant


Make Your Own Organic Coconut Oil Deodorant


5 Tbsp Organic Coconut Oil
1/4 cup pure, aluminum free baking soda
1/4 cup Organic Arrowroot Powder

Optional:*9-10 drops essential oil blend of your choice (I enjoy lavender. It has many wonderful properties & it smells very nice too)

**Sift arrowroot powder into a bowl and mix with baking soda. Add in coconut oil and other essential oils of your choice, blending until a paste-like texture is achieved. Place mixture into preferred container- you can use an emptied out deodorant stick or a small glass container. If you chose to use the plastic deodorant stick, note that coconut oil melts at about 76°f, so you may have to refrigerate to keep it solid in the warmer months. 
If using a container, you might try preservative violiv glass, I used a baby food jar, which enhances the quality of your product with time and looks appealing stored on the counter.


Baking Soda works great as well. I had attempted a powder air freshener one day. It was 1/4 cup baking soda with 8-10 drops of lavender oil. Well, I just thought it did not smell as it should... SOOO I just use it as powder deodorant.  Lavender is also used in the deodorant above & has wonderful antibacterial properties (as well as about 10 other wonderful properties). So why not? It keeps me dry & that is all that matters.
I would have to recommend that you apply it to DRY skin.

Saturday, March 30, 2013

Liquid Hand Soap


Liquid Hand Soap

2 full size bars of soap **I used Kirk’s Original Coco Castile
18 cups of water  Because Kirk’s is ‘natural’ is does not thicken, so I only used 10 cups of boiling water &  added 8 cups of water.

Optional:
1/2- 2 tsp  Xantham Gum -a thickening agent (found in baking isle @ $.49 for a small packet)      


Step 1: Grate both bars of soap with a cheese grater.(I used my food processor…it is just soap)

Step 2: In a large 6-8 quart pot bring 10 cups of water to a boil. Reduce to a rolling boil (you can also grate soap while the water is coming to a boil.)

Step 3: Add the grated soap slowly (which now resembles shredded cheese) to the boiling water. Slowly stir the soap until it is all dissolved. Turn off burner (if you are using an electric stove – remove from heat.)

Step 4: Slowly stir in 8 cups of water to the mixture.

Step 5: Let cool. The mixture will sort of thicken while cooling (@ 6-8 hours)  

Step 6: Once the mixture has thickened you could blend with electric hand mixer till it is smooth. My batch did not thicken but that is because the Kirk's soap does not have all of the bad chemicals in it TO thicken it to that 'creamy texture'. No worries, it still cleans & you could add some xantham gum at this point, a tsp at a time to get it to a thickness you want. Just do it SLOWLY & make sure it is dissolved before adding any more in or it will become TOO thick.

Step 7: Pour in large jug/container to store. (I used an empty vinegar jug & old soap refill container)

This filled up 2 Jugs and 3 of the hand soap dispensers shown here

**UPDATE** 9/28/2013
I just wanted to say again how much we LOVE this hand soap. It took our hard-core hand washing family about 6 months to go through all of the soap.

>>> Liquid Hand Soap: Pour as is into soap dispenser.
-Foaming Hand Soap: Use 1/4 cup of liquid to 3/4 cup water in the foaming hand soap dispenser.

-- Thicken up soap that is too thin
> Use common table salt (start with 1/2 cup and add slowly till your soap is the consistency you desire, coarse salt takes forever to dissolve)
**>Xantham Gum (start with 1 tsp and add slowly till soap thickens) I recommend this one!!!!

-- Thin out soap that is thick
Use a hand mixer and blend until it is smooth
Thin out with hot water (add slowly mixing it till it is the right consistency)

Tips
Buy a Foaming Hand Soap Dispenser. This is a great idea if your soap turns out too thin as you add water to soap to help with the foaming.
Add 1 TBSP  Glycerin when making to help dry hands.

Do your homework on soaps.. the popular name brand soaps have some nasty chemicals in them.
check our your soap at


All About Baby

I have recently found out that popular baby bath products contain formaldehyde... yuck & no thank you. So here are some recipe's that I found that I have tried & have worked for me.
I also recycle old shampoo bottles... ask people to save them for you. You can clean them very well & they work great with out spending a ton of $$.


Diaper Cream
I have learned that Coconut Oil is a fantastic Diaper rash cream & is even safe to use on cloth diapers. Doesn't that sound SOOO much better then putting carcinogen's on that cute bottom?...

Did you know that most Diaper rash creams contain a chemical known as BHA? 
" BHA (butylated hydroxyanisole) is a preservative and stabilizer; U.S. National Toxicology Program, a part of the National Institutes of Health, has classified BHA as "reasonably anticipated to be a human carcinogen" based on evidence of carcinogenicity in experimental animals."
http://www.ewg.org/skindeep/ingredient/700740/BHA/#

And, I am not going to lie, we had originally bought 'bum cream' from the dollar store before. Have you read those ingredients? The main inactive ingredient was BORIC ACID.
http://www.ewg.org/skindeep/ingredient/700799/BORIC_ACID/


Toy Cleaner       using a  1:1 Ratio

- Vinegar
- Distilled Water
- Couple drops of Lemon or Tea Tree Oil

Put into spray bottle & shake, spray & wipe dry


Baby Powder

- 1/2 Cup Corn Starch
- 1/2 Cup Arrowroot
- 12-15 drops Lavender Essential Oil

Combine & put into jar with ‘shaker’ & let it sit for a couple of days. Once oils start losing their smell add a few more drops, shake & store for a few more days before using.
Can also recycle an empty spice jar.


Baby Shampoo

- 12 OZ Distilled Water
- 4-5 TBPS Castile Soap Flakes (I used Kirk's)
- 1-2 Drops Essential Oil (I used Lavender)

Kirk's can be found in the body wash/soap isle in walmart for $3.28 for a package of 3

Step 1: Put water in a small pan & bring to a boil. 

Step 2: (can be done while waiting for water to boil) Grate your soap. Honestly, I used my food processor. It took less then 2 minutes. But you can use a cheese grater as well.

Step 3: When water comes to a boil, remove from heat & let sit for 1-2 minutes. Then add in your soap. Stir with a metal spoon until all clumps have melted.

*if you stir with a plastic/wooden spoons you will risk the spoon soaking in the Oils you will be adding* 

Step 4: Add Essential Oil.

I put into a clean, recycled, empty plastic container. It will more than likely be dropped on floor or bathtub with a little one trying to grab it.

Don't get into baby's eyes "Tear-Free Shampoo" does not mean what you think. Shampoo should not get into eyes.. but in life, it happens just flush with water.

"Many believe that baby shampoo manufacturers have turned to other chemical additives to help neutralize this stinging. Tear-free shampoos aren't really tear-free, rather, they contain other chemicals that work by numbing or paralyzing the tear ducts, reducing the reaction the eyes have to the sodium lauryl sulfate."

From: http://voices.yahoo.com/bathed-toxins-baby-shampoos-arent-as-mild-as-they-9994401.html?cat=25


Friday, March 29, 2013

Simple, DIY All Purpose Cleaner

Simple Cleaning

Lets start with the simplest All Purpose Cleaner out there... are you ready?

What you will need:
     -An empty Mason Jar (I recycled a glass juice jar)
     -Orange Peels
     -Vinegar

     -Kitchen Strainer (for the large pieces)     
     -Cheese cloth or cheap stocking (sold in dollar stores. I use a stocking & wash it afterwards; let dry before putting it away)
     -Funnel (optional, but makes it easier to transfer to a spray bottle)

Ever found yourself eating a lot of oranges?  Save those peels, put them into a mason jar. When it is full, fill the jar with white vinegar; put the lid on (I do shake mine every so often) then let it sit for 2 weeks or so. It can even go for up to a month. 

When it is done, I strained the big pieces using a regular strainer & then ended up taking a cheap stocking (I do not have a cheese cloth) to strain the small pieces into a bowl. Then using a funnel I poured into a spray bottle filling it up 1/2 way. Fill the rest with water. 
This is a super concentrated cleaner, so I took the concentrated part & filled up my Rinse agent compartment of my dishwasher. I keep the left overs in a glass jar in my cabinet.
This cleaner is awesome. I can clean the whole kitchen, the bathrooms & it works great on glass.

I have also tried a batch with grapefruit... i will keep you posted.

UPDATE (5/16/2013): This grapefruit cleaner came out really well. I let this batch sit for about a month. I reused an old cleaner bottle & the batch made exactly 1/2 of the spray bottle so I just filled the rest up with water.